How to install Fedora on VirtualBox — step by step guide for students
To install Fedora on VirtualBox was one of the first things we were asked to do in our Computer Engineering II course (IC2) at ULPGC. It sounds simple but there are several steps where it’s easy to get lost if nobody guides you. This guide walks you through every decision so you understand what you’re doing and why, not just what buttons to click.
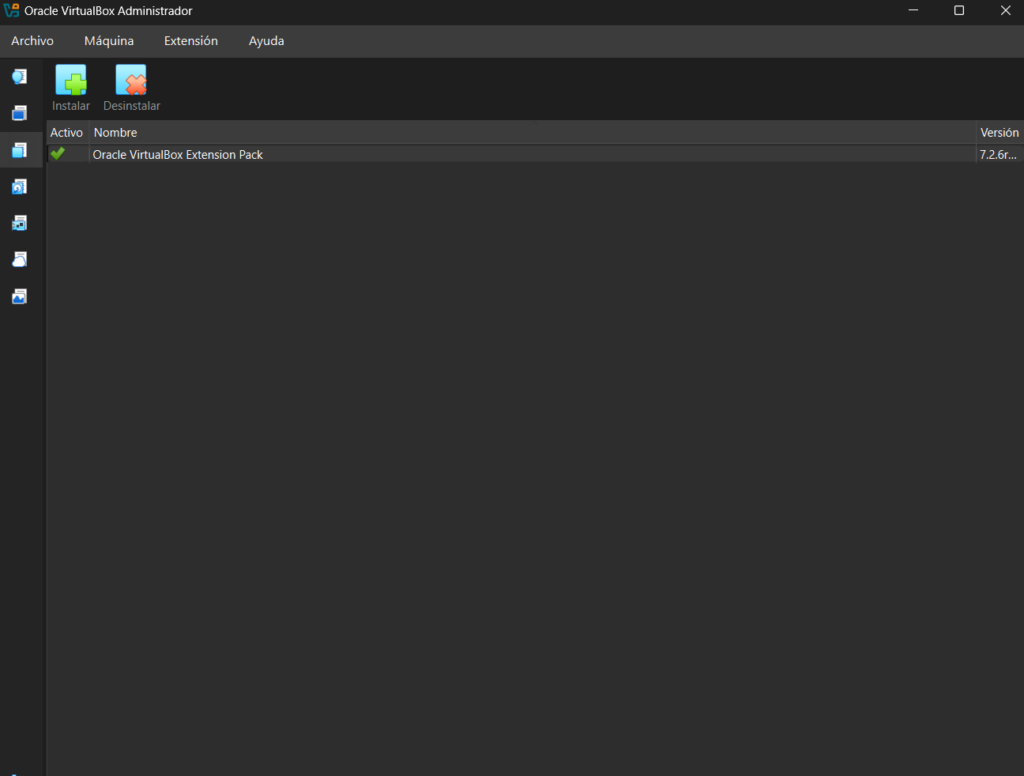
If you don’t have VirtualBox installed yet, download it first from virtualbox.org along with the Extension Pack. .
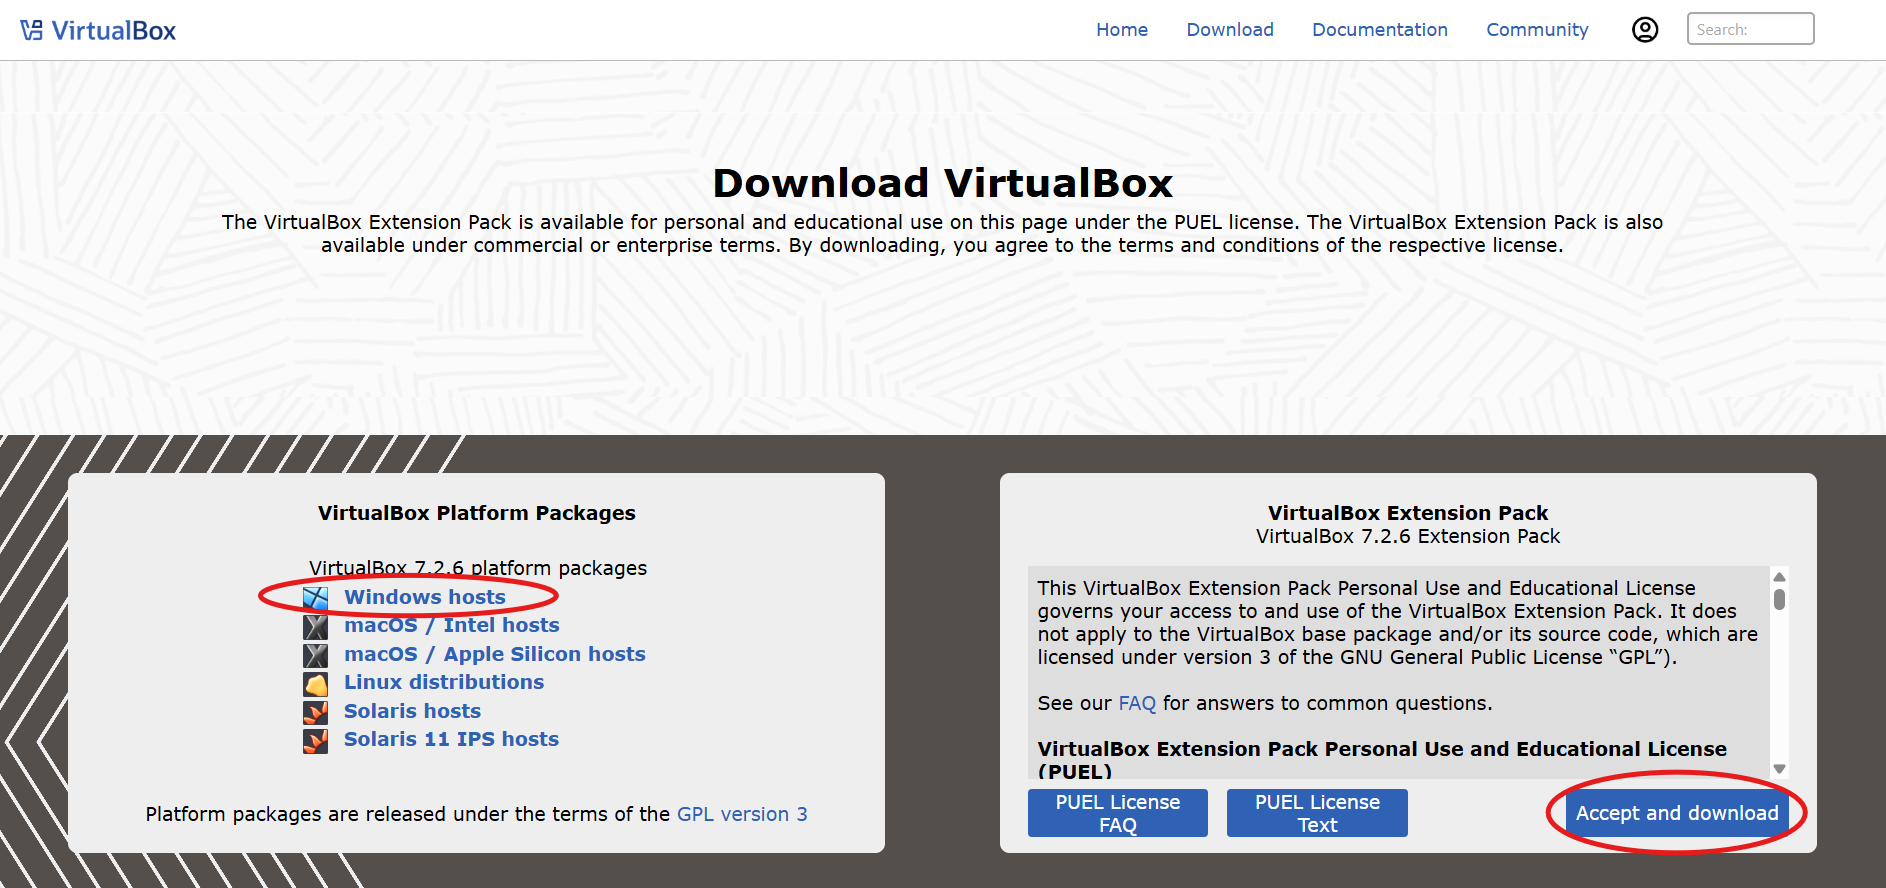
Table of Contents
What is VirtualBox and why use it?
VirtualBox is a program that lets you run one operating system inside another. In our case we’re going to run Linux (Fedora) inside Windows. This is called a virtual machine (VM).
Why do it this way instead of installing Linux directly? Because the virtual machine is safe, if something goes wrong it doesn’t affect your Windows installation. You can delete it and start over with no consequences. It’s the perfect way to learn Linux without any risk, which is exactly why universities use this approach for teaching.
Step 1 — Download Fedora
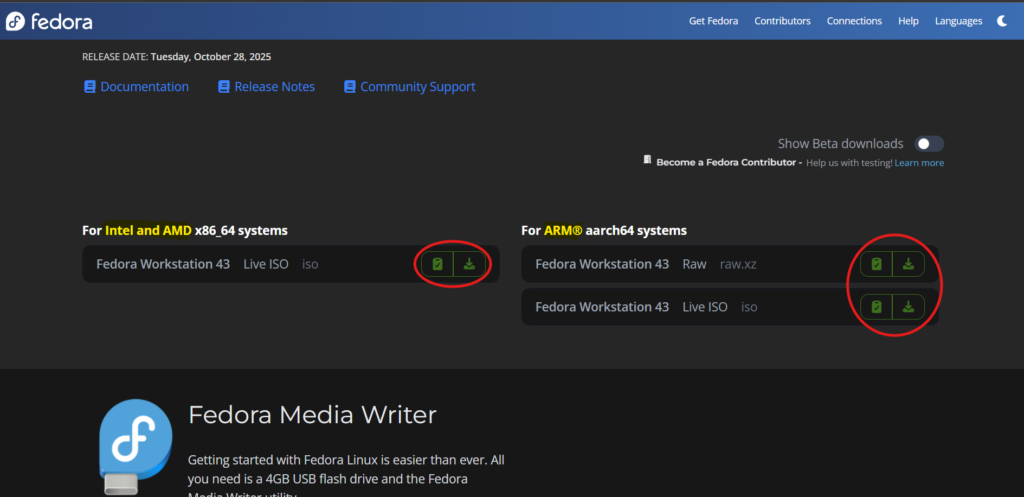
Before creating the virtual machine you need to download Fedora. Go to getfedora.org and download Fedora Workstation 43, the most up-to-date version with a graphical desktop, choosing the right download for your processor. The file is an ISO image of about 2GB, so it will take a while depending on your connection.
Save the ISO file somewhere you’ll remember — for example in Documents/ISOs.
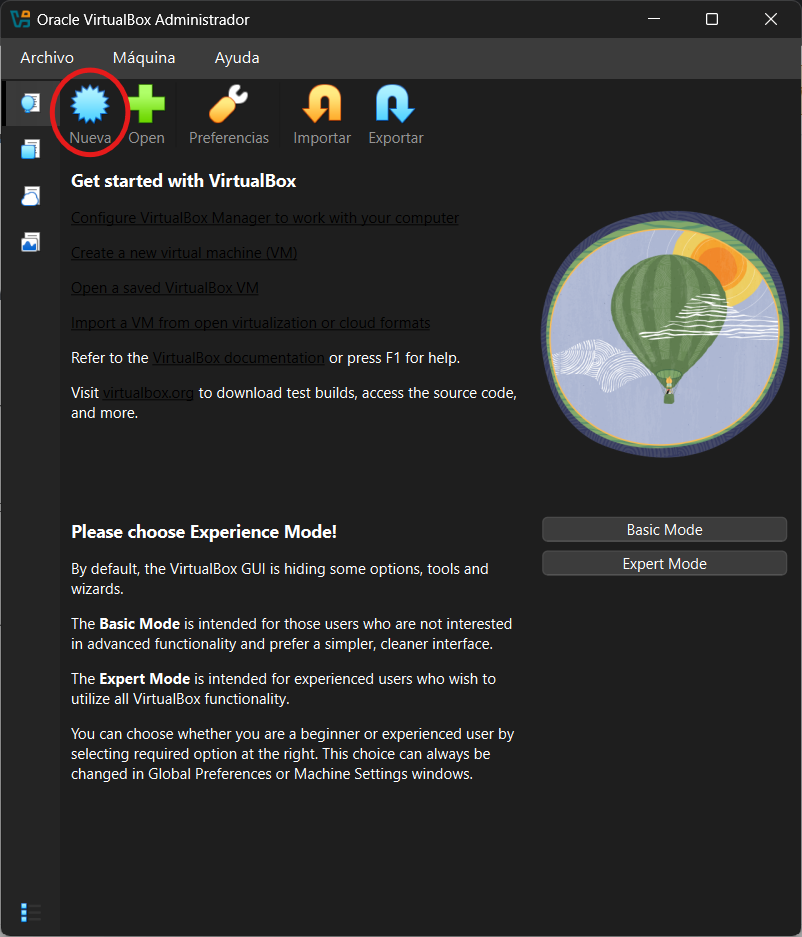
Step 2 — Create the virtual machine
Open VirtualBox and click New. Fill in:
Name: Fedora_IC2, give it a name you’ll recognise easily
Folder: leave the default ISO
Image: click the dropdown and select the Fedora ISO you downloaded
Type: Linux (selected automatically)
Version: Fedora (64-bit)
Do not check the “Unattended Installation” option, this way you control every step of the installation yourself. Click Next.
Step 3 — Configure RAM and create the virtual hard disk
This is one of the most important decisions. VirtualBox asks how much RAM to assign to the virtual machine.
With 16GB of RAM on your computer, the ideal configuration is:
RAM for the VM:  4096 MB (4GB) — enough for Fedora to run smoothly
CPUs:            2 — leave at least half for Windows
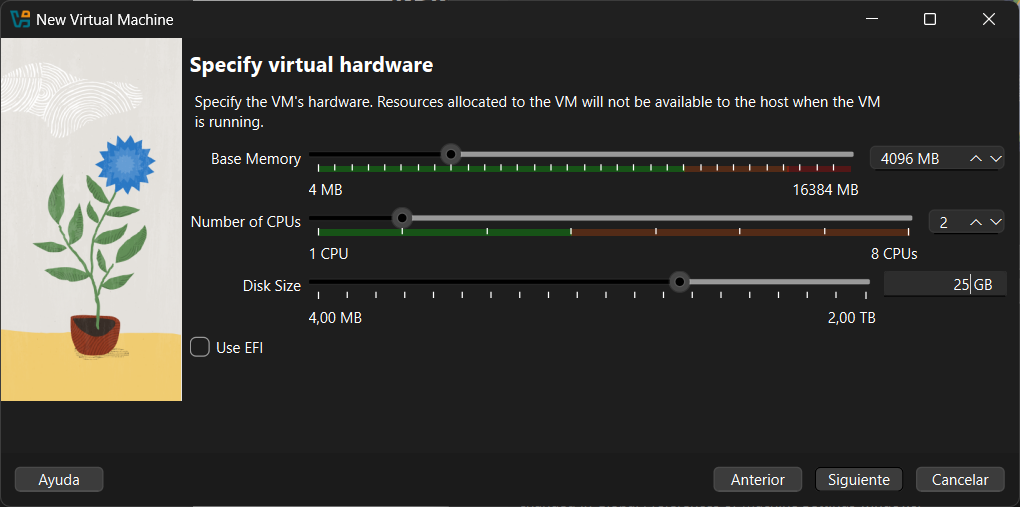
A key rule: never assign more than half your total RAM to the VM. If you give it too much, Windows will struggle and everything will slow down.
VirtualBox also needs to create a file on your hard drive that simulates the virtual machine’s hard drive. For the size I recommend a minimum of 25 GB. Fedora takes up about 10GB and you need space to work. With 25GB you have plenty of room for IC2 work.
⚠️ Note: You’ll see an option called “Use EFI”. Do not check it, for a learning virtual machine it’s not necessary and can cause boot problems.
Click Next, review that all the options are correct in the Summary tab and then click Finish. Your virtual machine is now created but Fedora isn’t installed yet.
Step 4 — Pre-boot settings
Before starting the VM there are two settings that make a big difference. Select your VM in VirtualBox, click Settings, switch to Expert view and go to:
Display → Video Memory → set to 128 MB
This prevents Fedora’s screen from running slowly or looking pixelated.
System → Processor → enable "Enable PAE/NX"
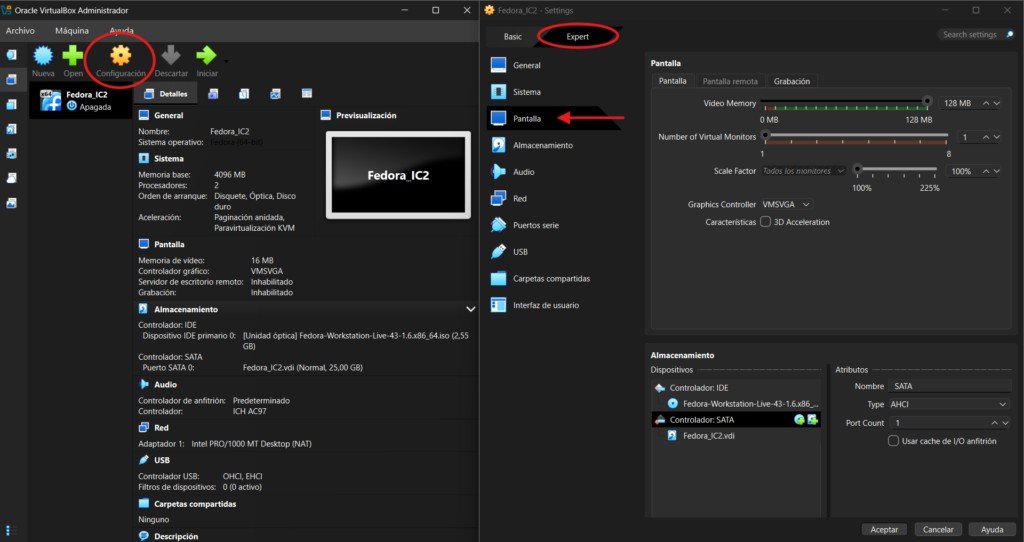
Remember the Extension Pack we installed earlier from the VirtualBox website? Now is the time to add it. In the left menu of VirtualBox, find Extensions and install the Oracle VirtualBox Extension Pack.
Step 5 — Install Fedora
Now we’re ready. Double-click your VM or click the Start button. VirtualBox will boot from the Fedora ISO you configured earlier.
You’ll see the Fedora welcome screen with two options. Select “Install Fedora” and press Enter.
The Fedora installer is called Anaconda. It’s quite visual and intuitive. Follow these steps inside the installer:
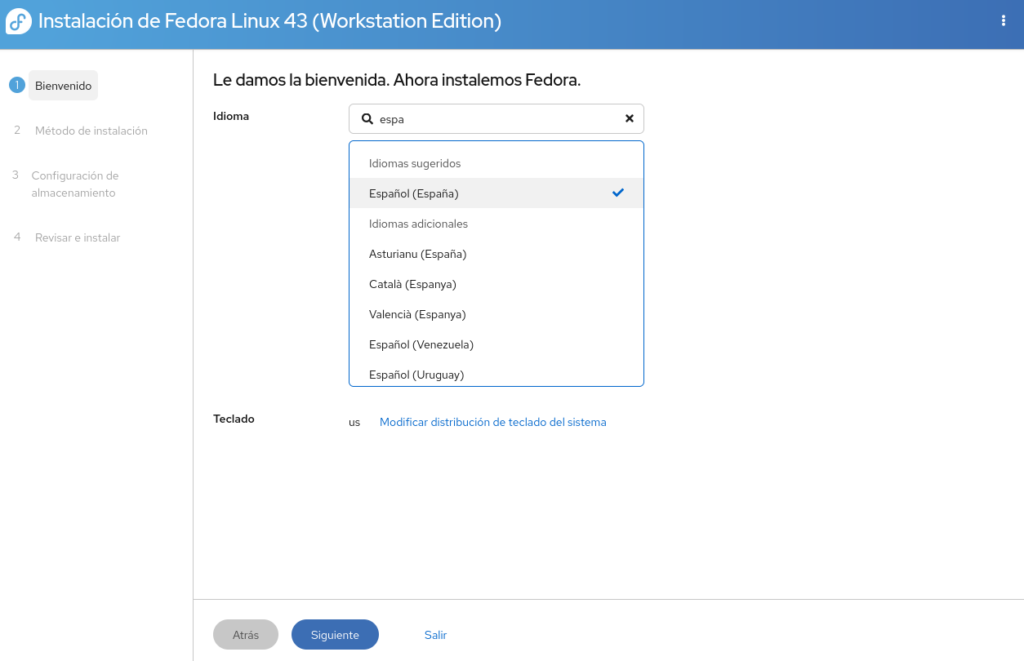
Language: Select English and click Continue.
Installation summary: You’ll see a screen with several icons. The ones with a warning triangle need configuration. Normally you only need to configure the installation destination.
Installation destination: Click it, select the virtual disk we created (it should be the only one available) and click Done.
When all the icons are free of warnings, click Begin Installation. The process takes between 10 and 20 minutes depending on your computer.
Step 6 — Initial setup
When the installation finishes it will ask you to restart. Click Restart System. When it boots again you’ll see the Fedora welcome wizard where you’ll configure:
System language:    English
Keyboard layout:    your preferred layout
User account:       your username and password
Write down your username and password, you’ll need them every time you start the VM.
When you finish you’ll see the Fedora desktop running inside your Windows. Installation complete.
Verify everything works
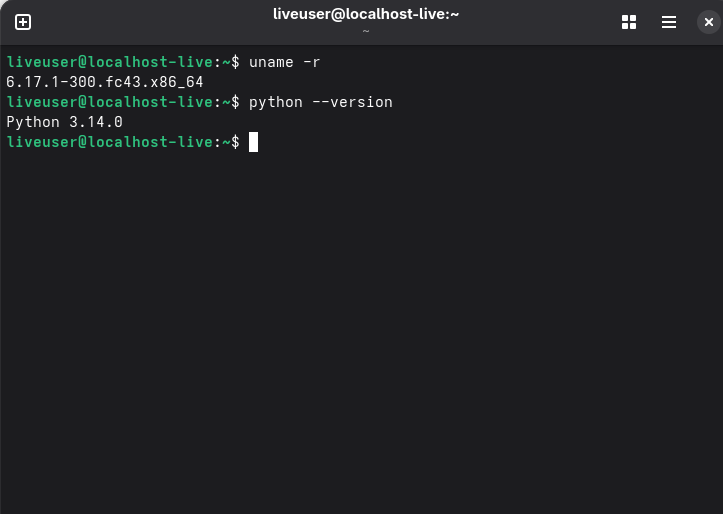
Open the Fedora terminal (search for “Terminal” in the applications) and type:
uname -r
This shows the version of the Linux kernel you’re running. If you see a response with numbers like 6.x.x-xxx.fc43.x86_64 everything is working correctly.
python3 --version
Fedora comes with Python 3 pre-installed — you can use it in your coursework directly from Linux.
Common problems — and how I solved them
Every single one of these errors happened to me while setting up Fedora on VirtualBox on Windows. If you run into any of them, don’t panic, they all have solutions.
Black screen on boot
Go to Settings → Display → increase video memory to 128MB if you didn’t do it before. This is the most common cause of a black screen on first boot.
VM is extremely slow and shows a green turtle
Windows has its own virtualisation system called Hyper-V that conflicts directly with VirtualBox. While Hyper-V is active, VirtualBox can’t access the hardware directly and runs painfully slowly. The solution has three steps, save everything before starting because each step requires a restart:
Step A
Press the Windows key, type Turn Windows features on or off and open it. Find and uncheck everything related to Hyper-V. In my case only one was active:
Windows Hypervisor Platform
You might see more options on your computer such as Hyper-V, Virtual Machine Platform or Windows Sandbox — uncheck all of them. Click OK and restart.
Step B
Go to Settings → Privacy & Security → Windows Security → Device Security → Core isolation details. Turn off Memory integrity and restart.
Step C
Open CMD as administrator and run:
bcdedit /set hypervisorlaunchtype off
Restart one final time. If everything worked you’ll see a blue V in the bottom right corner of VirtualBox instead of the turtle. That confirms VirtualBox has direct access to the hardware.
⚠️ If you later need WSL2 or Docker Desktop run bcdedit /set hypervisorlaunchtype auto to revert.
VirtualBox interface is completely blank
If when you open VirtualBox you see only the window background, no menus, no VM list, nothing, the interface is completely broken. This usually happens after disabling Hyper-V, when VirtualBox’s internal drivers get stuck in an inconsistent state. It’s not your fault, it happens to a lot of people.
The only solution is to completely uninstall VirtualBox and remove all traces:
1. Uninstall from Settings → Apps
2. Open File Explorer and manually delete:
   C:\Users\YourName\.VirtualBox
   C:\Program Files\Oracle\VirtualBox
3. Restart Windows
4. Download the latest version from virtualbox.org and reinstall
5. Restart one more time
After this VirtualBox will open clean and without bugs.
Black or blank screen when starting the VM after installing Fedora
VirtualBox’s default graphics configuration isn’t compatible with Fedora on all systems. Before installing Fedora, with the VM created but not yet started, go to:
Settings → Display and set exactly this:
3D Acceleration:     disabled ← paradoxically enabling it causes more problems
Video Memory:        128 MB   ← set to maximum
Graphics Controller: VBoxSVGA ← this is the key change
If you already installed Fedora and have this problem, shut down the VM, apply these changes and start it again — in most cases it fixes without reinstalling.
VM keeps booting into the Live Environment after installation
If instead of seeing the login screen you see the “Welcome to Fedora” and “Install Fedora to Hard Drive” options again, VirtualBox is still booting from the Fedora ISO instead of the virtual hard drive where the system is already installed. The ISO has boot priority over the disk.
Solution:
1. Shut down the VM completely
2. Go to Settings → Storage
3. In the CD/DVD controller you'll see the mounted Fedora ISO — click on it
4. Click the disk icon and select "Remove disk from virtual drive"
5. Start the VM again
This time it will boot from the virtual hard drive and you’ll see the Fedora login screen with your username and password.
“VT-x/AMD-V hardware acceleration is not available”
You need to enable virtualisation in your computer’s BIOS. Search Google for “enable virtualisation BIOS + your laptop model” — the process varies by manufacturer but usually involves pressing F2 or Del on startup and finding a setting called Intel VT-x, AMD-V or just Virtualisation Technology.
Screen doesn’t resize
This is fixed in the next article when we install the VirtualBox Guest Additions — a set of drivers that improve the integration between the VM and the host system including automatic screen resizing. .
What’s next?
Next up: setting up a shared folder between Windows and Fedora.